![]()
The virtual host is very important when you working on a large application on local environment. As a developer, we do web development in our local environment and when the work is done, we migrate the site to a live environment. The local setup provides a fast, easy to debug, easy to edit files, development environment. One can do experiments, apply the new logics or new techniques and manage the project code very easily. If you are working with WordPress, setting up virtual hosts and XAMPP stack is a 3 steps task. Let’s walk through the the steps to create and manage virtual host. You can also create multiple virtual hosts by just repeating the steps below
What is a Virtual Host?
A virtual host is used to host multiple domains in a single server. This means multiple different websites uses the same server and uses the same resources same as the shared hosting we see in the market, offered by many hosting providers.
Before we go to step 1, we need to create a folder that we want to use for the virtual host. So, let’s get started.
Step 1: Create the Root Folder
Let’s create a folder that we want to use for the virtual host you’ll be creating in the next steps. You can name anything but best if you create the folder name same as the project domain. For example:- testvirtual.local
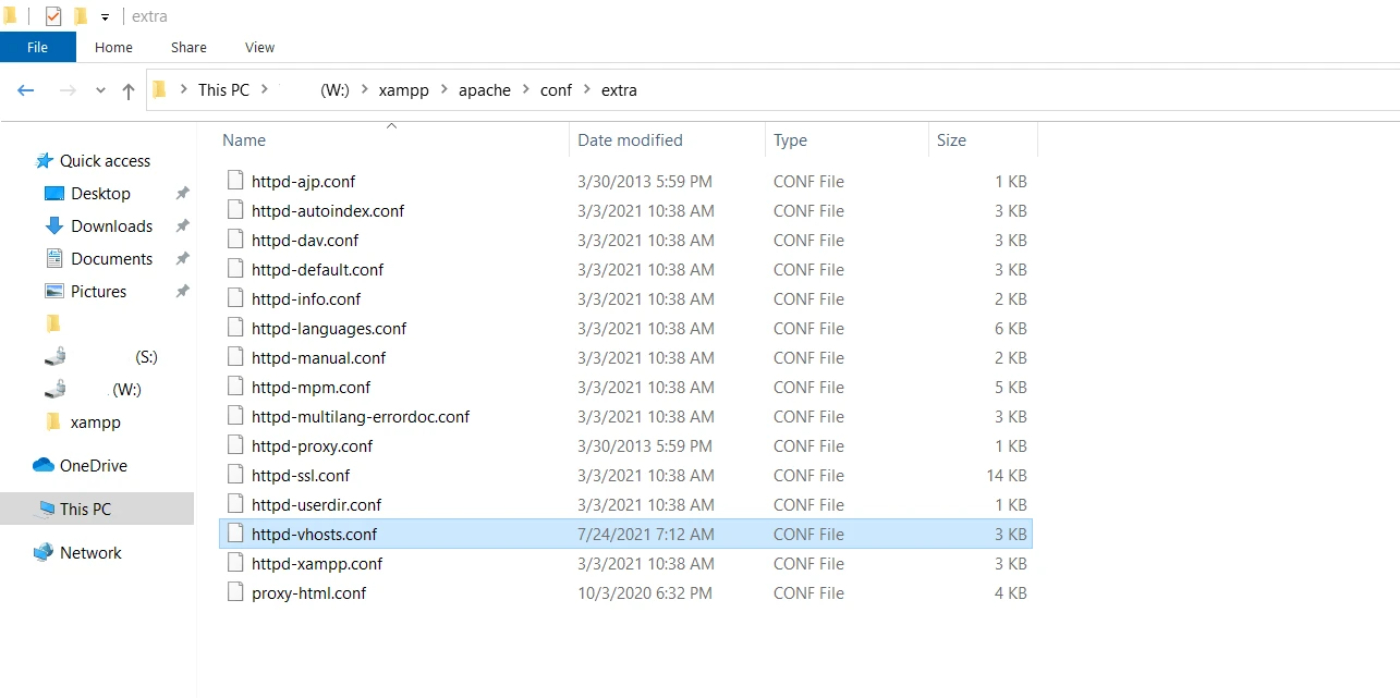
Step:2 XAMPP Apache Configuration
Go to the Apache configuration file (httpd.conf), open the file httpd-vhosts.conf in a code editor (could be open in notepad as well). You can refer to the file location below-
File location: W:\xampp\apache\conf\extra.

Now copy and paste the below code at bottom of the config file-
     <VirtualHost *:80>
                 DocumentRoot "DriveName:\xampp\htdocs\testvirtual.local"
                 ServerName testvirtual.com
                  <Directory "DriveName:\xampp\htdocs\testvirtual.local">
                  </Directory>
     </VirtualHost>
Or you can use the below VirtualHost container as well which we are using in this tutorial:
<VirtualHost *:80>
     DocumentRoot "C:\xampp\htdocs\testvirtual.local"
     ServerName testvirtual.com
          <Directory "C:\xampp\htdocs\testvirtual.local">
               Require all granted
          </Directory>
</VirtualHost>
Save and close the file.
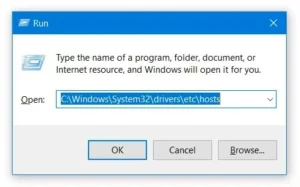
Step 3: Locate Your Hosts File
Begin by finding your system’s hosts file. This file acts as a local DNS for your machine, mapping domain names to IP addresses. For Windows, it’s commonly found at C:\Windows\System32\drivers\etc\hosts. On Unix-based systems, you can locate it at /etc/hosts.
You can also use win+r/R to open the file directly- C:\Windows\System32\drivers\etc\
There you will see “127.0.0.1 localhost” is added already. Leave it as it is.
In next line write ” 127.0.0.1 testvirtual.local”
Final Step: Restart XAMPP
Once you’ve configured your virtual hosts, restart XAMPP to apply the changes. This ensures that Apache recognizes the new settings.
Congratulations! You’ve successfully configured multiple virtual hosts in XAMPP. This powerful feature simplifies your development environment, allowing you to work on diverse projects without the hassle of constant configurations.